How to fix infinite reboot loop with Windows Startup Repair
Last updated on March 13th, 2021Are you stuck in an infinite reboot loop with Startup Repair? I recently suffered this following a BSOD (Blue Screen of Death) after initiating xbootmgr. This article aims to use my experience to offer a fix.
The Issue
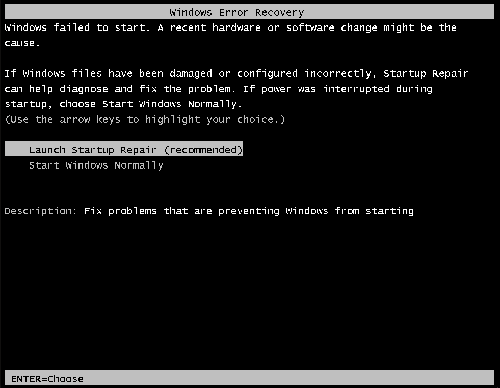
You are unable to access Windows. Every reboot results in a “Windows Error Recovery” boot menu offering to “Launch Startup Repair (recommended)”, or “Start Windows Normally”.
Choosing “Start Windows Normally” results in a Blue Screen of Death (BSOD), forcing you to reboot again.
Choosing “Launch Startup Repair” results in a failed repair, where the system claims to have implemented a repair, and forces you to reboot, which results in the same BSOD issue.
The Cause
This type of issue is likely to be caused by:
– A driver, or other Windows new configuration issue
– A file corruption on your hard drive
The Fix
The obvious fix is to boot into Windows in “Safe Mode”, or ask Windows to use the “Last Known Good Configuration” (LKGC). If you are looking at this article however, it is likely that you are not being presented with this option.
The following steps should be used to attempt a fix.
Fix 1: Last Known Good Configuration
Startup Repair will not offer the usual additional repair options, if it believes it has found an issue automatically. Startup Repair can however be cancelled, but only at the very start of its testing cycle.
- Choose the “Launch Startup Repair (recommended)”
- If you have Bitlocker drive encryption turned on for your drive:
As Startup Repair launches, it will ask for your Bitlocker Recovery pin. You can cancel this dialog as this fix does not require access to your Bitlocker encrypted partition. - As soon as the Startup Repair itself starts, press the Escape key (ESC) once. Startup Repair should offer to cancel the repair. Accept this.
- Choose Command Prompt from the list of “System Recovery Options”.
- In Command Prompt, type “bcdedit” and press enter. This should return a list of devices. Check if the one with a “systemroot” of “\Windows” is called “{default}”. If it has a different name, use this in-place of “{default}” in the below steps.
- In Command Prompt, type
bcdedit /set {default} lastknowngood on - If the last command was successful, close the Command Prompt window, and cancel out of Startup Repair, so the system reboots.
The system will now automatically attempt to boot with the last known good configuration of drivers etc.. If this resolves your issue, you have no further action to take, as the system will use this good configuration in future, if it was successful.
Fix 2: Attempt a manual fix in Safe Mode
Startup Repair will not offer the usual additional repair options, if it believes it has found an issue automatically. Startup Repair can however be cancelled, but only at the very start of its testing cycle.
- Choose the “Launch Startup Repair (recommended)”
- If you have Bitlocker drive encryption turned on for your drive:
As Startup Repair launches, it will ask for your Bitlocker Recovery pin. You can cancel this dialog as this fix does not require access to your Bitlocker encrypted partition. - As soon as the Startup Repair itself starts, press the Escape key (ESC) once. Startup Repair should offer to cancel the repair. Accept this.
- Choose Command Prompt from the list of “System Recovery Options”.
- In Command Prompt, type “bcdedit” and press enter. This should return a list of devices. Check if the one with a “systemroot” of “\Windows” is called “{default}”. If it has a different name, use this in-place of “{default}” in the below steps.
- In Command Prompt, type
bcdedit /set {default} safeboot minimal - If the last command was successful, close the Command Prompt window, and cancel out of Startup Repair, so the system reboots.
The system will now automatically attempt to boot in Safe Mode. If this is successful, you can attempt to remove any recent drivers, program installations, or run chkdsk to resolve the issue.
Note: Your system will continue to boot into Safe Mode until you run the following from Command Prompt (you can do this from the Command Prompt in Safe Mode itself): bcdedit /deletevalue {default} safeboot